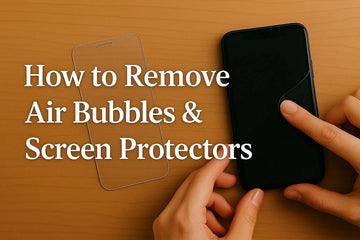
A smooth mobile screen looks great and makes everyday use more enjoyable. However, installing iPhone screen protectors can sometimes leave behind air bubbles. Luckily, such issues are easy to handle with the right steps. When trying to fix those pesky bubbles or replace an old protector, this guide will walk you through everything required to be done. Follow along to get to know what steps to take!
Why Do Screen Protectors Bubble?
Final Thoughts: Keep Your Screen Smooth and Clear
Why Do Screen Protectors Bubble?
It’s frustrating to see these air pockets appear right after applying a screen protector. It specially makes you angry when you’ve tried to be careful. Yet understanding why this happens can help prevent it next time when installing iPhone screen protectors. Summarized below are the most common causes behind these air bubbles:

1. Dust or Debris on the Screen: Even tiny particles can trap air and create visible bubbles once the protector is placed.
2. Improper Alignment: When the protector isn’t lined up correctly on the first try, air can get trapped underneath during adjustment.
3. Applying Too Quickly: Rushing the installation often leads to uneven pressure and air pockets.
4. Weak Adhesive Quality: Some inferior screen protectors don’t stick properly, which allows bubbles to form over time.
5. Reusing an Old Protector: Trying to reapply a used screen protector can result in poor adhesion and leftover air pockets.
How to Remove Air Bubbles from iPhone Screen Protectors: Pro Tips for Bubble-Free Application (Without Damaging Your Device!)
Seeing these air pockets under your screen protector is annoying, no doubt. The good news is that they're often fixable without removing the entire protector. With a little patience and the right approach, you can smooth them out and get that clear look back. Described below are some pro tips to help you remove bubbles from iPhone screen protectors safely and effectively:
Tip 1. Use a Plastic Card Wrapped in Cloth
Gently press the bubble outward toward the edge using a credit card wrapped in a soft cloth. That helps avoid scratches while applying even pressure.

Tip 2. Push Out Small Bubbles with Your Fingertip
For tiny air pockets, your fingertip can work well. Apply slow, firm pressure and guide the bubble toward the nearest edge.

Tip 3. Lift Gently and Reapply (If Needed)
When the bubble won’t move, carefully lift the screen protector from the nearest corner using a thin plastic tool. Do it just enough to release the trapped air and then reapply slowly.

Tip 4. Apply in a Dust-Free Environment
Doing this in a bathroom after a hot shower can reduce airborne dust. Clean conditions make a bubble-free finish much more likely.
Tip 5. Use a Screen Protector Installation Kit
Some iPhone screen protectors come with tools like alignment frames and dust removers. Opting for them makes the process smoother and lowers the chance of bubbles.

Pro Tips to Avoid Bubbles in the First Place: What NOT to Do (To Avoid Damaging Your Device or Protector)
Knowing how to fix the annoying bubbles is excellent, but preventing them in the first place is much better. Many common mistakes can actually increase the risk of these air pockets or damage your iPhone or screen protector. Adhere to the following tips to get the whole process right from the start:
1. Don’t Use Sharp Objects to Pop Bubbles
Going for pins or blades can scratch your protector or screen during the task. Doing that can also mean damaging the display underneath, which can be costly. Instead, use soft options like a cloth-wrapped card or your fingertip.
2. Avoid Excessive Peeling and Re-Sticking
Lifting and reapplying the protector repeatedly weakens the adhesive a lot. This practice also often introduces more dust, leading to even more bubbles. It's better to start fresh with a new protector if placement goes wrong.
3. Never Install in a Dirty or Humid Room
Dust and moisture can both get trapped under the protector. These particles not only cause bubbles but may also leave permanent marks or reduce screen sensitivity. Always opt for a clean space to get it installed, like a steamy bathroom after a hot shower.

4. Don’t Skip Cleaning the Screen Thoroughly
Even minor smudges or lint can lead to trapped air, ruining the whole display. Thus, use an alcohol wipe or a microfiber cloth to clean the screen fully. A properly cleaned surface gives the protector the best chance to get evenly installed.
5. Avoid Touching the Sticky Side of the Protector
Fingerprints and skin oils can interfere with the adhesive to create problems. That makes it harder for the protector to stick properly and increases the chances of bubbles. Handle the edges only and keep the sticky side facing down until application.
Final Thoughts: Keep Your Screen Smooth and Clear
A perfectly applied protector keeps your phone looking sharp and protects it from everyday wear. After learning how to fix bubbles and avoid common mistakes, it’s just as important to keep a few final reminders in mind. These simple habits can help you maintain that clear screen when dealing with iPhone or Apple Watch screen protectors:

1. Bubble-Free Today, Scratch-Free Tomorrow
Taking the time to apply your screen protector carefully means fewer air pockets now and better protection later. A well-fitted protector stays in place longer, guarding your screen from scratches. Moreover, it keeps dirt and daily wear to a minimum without frequent replacements.
2. Consider a Professional Installation for Expensive Devices
To avoid all sorts of risks to your iPhone or Apple Watch, getting the screen protector installed by a pro might be worth it. Precision matters more with expensive gadgets, and a small mistake during DIY installation could lead to frustration or even damage.
Yet if you’d rather, do it yourself, ESR makes it much easier. They offer a wide range of screen protectors designed specifically for iOS devices and Apple Watches. What sets ESR apart is not just the product quality, but also the convenience. Their screen protectors often come with installation tools that simplify the entire process. These tools are built around 3 main goals:
1. Ensuring bubble-free results.
2. Keeping your device safe from damage.
3. Making installation quick and hassle-free, even for beginners.
To read more about these three installation approaches featured by ESR, follow this article: Dust-Free Screen Protector Installation 5 Genius Hacks You Need to Try!
3. Choosing the Right Screen Protector for Your iPhone
Not all protectors are created equal, and picking the right one can make a big difference. Some focus on toughness, others on clarity or privacy benefits. The key is to choose one that suits your lifestyle and how you use your device. Furthermore, what type of protection you want is also a big factor. A simple comparison of common materials and their main functions is below of iPhone screen protectors:
|
Material Type |
Key Features |
Best For |
|
Tempered Glass |
Strong, scratch-resistant, smooth feel |
Everyday use, high-impact protection |
|
TPU Film |
Flexible, self-healing, thinner design |
Light protection, curved screens |
|
Privacy Glass |
Limits side viewing, adds screen security |
Crowded places, commuters, and office use |
|
Matte/Anti-Glare |
Reduces reflections, resists fingerprints |
Outdoor use, bright environments |
|
Blue Light Filter |
Blocks blue light, reduces eye strain |
Long screen time, night use |
Conclusion
In summary, getting a smooth and bubble-free screen doesn’t have to be stressful. With the right steps and a little patience, you can apply or replace protectors with confidence. For top-quality options, ESR stands out as a trusted source for iPhone screen protectors, Apple Watch covers, and easy installation tools. When protecting a new device or upgrading your old one, ESR makes the process simple and safe.
Use our discount code “blog20” at checkout to unlock exclusive savings on your favorite phone accessories—only at ESR!


